ribbon tying tutorial and a new floor
I have been neglecting my blog again but I had a really, really good excuse. A new mudroom FLOOR!!! For those of you that don't live in the north or are city dwellers a mudroom is where we enter the house, in our case through the garage, and shed our muddy boots and coats so as not to spread the mess to the rest of the house. Much needed since even though it feels like July outside snow (ick!) is not that far away. So they started laying the floor on Saturday and finished on Sunday but because the mortar had to be laid really thick on the stairs I wasn't able to walk on it until Wednesday morning. Not a big deal right? Wrong! The only way to get to my office is (you guessed it) through the mudroom. Needless to say I had a ton of emails to sort through yesterday and a workshop to input as well as all that nit picky little stuff that you need a computer for like paying bills.
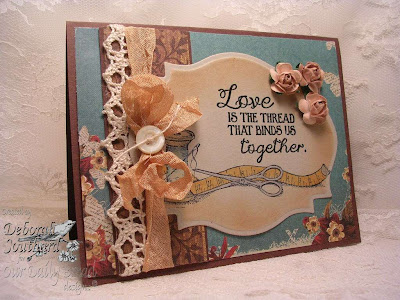
Did a bit of stamping this morning and this is what I came up with.
 What I used:
Autumn Harvest stamp set, Linen background stamp
Chocolate Chip, Old Olive, More Mustard, Bashful Blue and Whisper White card stock
Timber Brown Stazon stamp pad, Old Olive and More Mustard classic stamp pad,
Bashful Blue, More Mustard, Old Olive, Chocolate Chip re-inkers for watercoloring
Bashful Blue grosgrain ribbon, aqua painter, cutter kit distressing tool and a sponge
The main image is stamped in Timber Brown Stazon then watercolored with re-inkers and an aqua painter. I sponged the edges with chocolate chip ink then layered the image on a distressed piece of chocolate chip card stock. After I had cut out all of my pieces of card stock and had figured out my layout I stamped all of the pieces with the linen background stamp inked with more mustard classic ink pad. Including the main image but the ink was stamped off several times first. I then sponged and distressed all the edges before assembling the card.
This morning I am working on my Christmas cards and while I was in the process of tying 40 knots I remembered all the times that you (my customers and friends) have asked me how I get my knots to come out the way they do so I decided to do a tutorial for you.

 When I tie a knot I always lead with one end. This is really easy to do if you leave the ribbon attached to the spool then cut when you are done, because it forces you to work with only one end of the ribbon. I generally start with my leading end coming from the right and crossing it over.
 I then tuck the leading end under.
 and clip it with the tweezers from the Stampin' Up! tool kit.
 I then pull the end still attached to the spool, down and over.
 pull the leading up
 and tuck under

pull tight, but not too tight, this keeps the knot fairly flat and trim.
 I was not able to get a really good close up of a knot but this should give you a better idea of how do it.
Did a bit of stamping this morning and this is what I came up with.
 What I used:
Autumn Harvest stamp set, Linen background stamp
Chocolate Chip, Old Olive, More Mustard, Bashful Blue and Whisper White card stock
Timber Brown Stazon stamp pad, Old Olive and More Mustard classic stamp pad,
Bashful Blue, More Mustard, Old Olive, Chocolate Chip re-inkers for watercoloring
Bashful Blue grosgrain ribbon, aqua painter, cutter kit distressing tool and a sponge
The main image is stamped in Timber Brown Stazon then watercolored with re-inkers and an aqua painter. I sponged the edges with chocolate chip ink then layered the image on a distressed piece of chocolate chip card stock. After I had cut out all of my pieces of card stock and had figured out my layout I stamped all of the pieces with the linen background stamp inked with more mustard classic ink pad. Including the main image but the ink was stamped off several times first. I then sponged and distressed all the edges before assembling the card.
This morning I am working on my Christmas cards and while I was in the process of tying 40 knots I remembered all the times that you (my customers and friends) have asked me how I get my knots to come out the way they do so I decided to do a tutorial for you.

 When I tie a knot I always lead with one end. This is really easy to do if you leave the ribbon attached to the spool then cut when you are done, because it forces you to work with only one end of the ribbon. I generally start with my leading end coming from the right and crossing it over.
 I then tuck the leading end under.
 and clip it with the tweezers from the Stampin' Up! tool kit.
 I then pull the end still attached to the spool, down and over.
 pull the leading up
 and tuck under
pull tight, but not too tight, this keeps the knot fairly flat and trim.
 I was not able to get a really good close up of a knot but this should give you a better idea of how do it.


Comments