the change of season and the search for a purpose

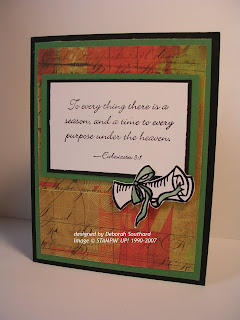
"To every thing there is a season, and a time to every purpose under the heaven" Ecclesiastes 3:1. One of my favorite verses and I always take comfort from it. Just knowing that there is a season and a time for everything gives me strength.
Jen (Jen70) over on SCS posts the Limited Supply Challenge. Today's is entitled Graduations Galore. She challenges us to make a graduation card using non-traditional stamps to make graduation cards, but you can also use graduation themed sentiments and images with them.
My eldest son is graduating from High School on June 24th so I need a card. I am struggling a little bit with the thought of him leaving the nest. I know I have done all I can do to get him ready for the world and he is so excited. But I am his mother and though I am positive that he will do well he is still that not so small baby I held in my arms for the first time less than 18 years ago. Now nearly a man and searching for his place and purpose in this world.
What I used to make it:
Words of Wisdom stamp set
diploma stamp from the $1 bin at ACMoore
Basic Black, Garden Green, Whisper White card stock
Basic Black and Garden Green classic ink pad
Basic Grey designer paper
aquapainter
How I did it:
This is one of those really, really quick cards. I don't think it took me 15 minutes to slap together (sorry Matt, just because it is quick doesn't mean it isn't thoughtful). Our school colors are green and white so I wanted to use those colors but need something to give it some interest. Since the Basic Grey 6x6 designer paper packages (did I tell you $1.97 on clearance at Joanns?) are still sitting on my desk I picked this one out that had a hit of green and was pretty masculine looking. Layered the designer paper on Garden Green card stock then onto a Basic Black card body. Stamped the Ecclesiastes verse with Basic Black on Whisper White, then matted with black and green. The diploma is stamped in Basic Black on white then I used my aquapainter and Garden Green ink to color the ribbon. I cut out the diploma. Simple

Well since I am on a roll this morning I decided to finally put together the prototype of Matthew's graduation announcements and party invitations. I could not believe the cost of buying the ones the school was selling when I was sure I could come up with something really clever on my own. I wanted to make invitations that were the size of a #10 business envelope and print the insides up on the computer. And this is what I came up with. The "cap" is the graduation announcement and the information is "inside" the "cap". The "gown" is the graduation party invitation. And before any of you Cuttlebug addicts have a heart attack, I have a confession. Yes I broke the embossing folder, ON PURPOSE!! I wanted the who, what, where information in the middle of the card so I had to take apart the embossing folder to do it. I will pick some DMC floss today at ACMoore to make the tassels and I will probably add an honors cord to the "gown".

What I used:
Basic Black and Whisper White card stock
Basic Black classic ink
diploma and cap from $1 bin at ACMoore
Cuttlebug and invitation embossing folder
Coluzzle cutting system
white and hunter grosgrain ribbon
1/2 inch circle punch
How I did it:
For the "gown" I took a 8 1/2 x 11 piece of black and I scored on the long side at 3 1/2 inches from each end then folded them in. I measured and marked the card stock at 1 inch from the fold and 2 inches down from the top, on each side and cut between the marks. I broke my embossing folder and embossed the invitation in the middle of a 3 3/4 x 10 3/4 piece of white cardstock and stamped my diploma and cap with a black ink pad. When I mass produce these I will print all the information on the computer first then cut the cardstock and emboss it, then stamp the images. The "cap" is a 4x4 piece of black cardstock. I cut a 3 inch circle out of white cardstock with the coluzzle (this circle will contain the details of his graduation) then attached it to the black cardstock. On the top I attached the tassel and a black button (actually a 1/2 circle) with glue dots.


Comments