mission re-organization...
I have been on a mission this fall to rearrange my creative space. In my Stampin' Up! demo days I always had my Stampin' Up! stuff separated from the contraband but now those days are over and things needed to change. The biggest changes I wanted to make were to:
 This picture shows my secondary work area. The counter height is nice to stand at and it has plenty of room to spread out a two page scrapbook layout as well as providing space for a friend to join me. Note the storage spaces both above and below the counter. The baskets on top of the cabinets hold sewing patterns as well as misc other crafting supplies.
 This is the view from in front of freezer showing my Jetmax storage units and shelves as well as my laundry sorter. The double doors seen through the doorway lead to our family room.
 View from the other corner of the room showing washer, dryer and freezer. Note my grandmother's sewing box on top of the freezer (the white thing on top of that is my homemade photo light box) and my design team calender on the freezer door.
 This is my main work surface. Under the dust cover is my antique sewing machine. The dust cover, my curtains, stool cushion and ironing board cover were all made from a repurposed table cloth. All my pens, pencils and markers are within easy as well as my most used tools.
 Just to the left of my table is my rolling cart which hold my paper cutters and scrap file.
 A closer look at my secondary work area. The cabinets are stock cabinets from Lowes, as is the counter top. The drawers on the left hold re-inkers, photographs and albums. On the right the drawers hold tools, alterable items and album page refills. I plan on acquiring a 14x26 inch piece of glass to put on my counter top so that I can leave scrapbook pages in process out but covered so that they can not be disturbed by cats or children.
 On the counter top is my extensive collection of ribbon. Current Stampin' Up! ribbon is on the right. The 4 ribbon boxes hold all the rest. The jar holds ribbon scraps.

 Since ya know you want to look in my cupboards here is a peek of the center one.
 and the right holds card stock and envelopes.
 The left one holds more card stock, craft stamp pads, embellishments and adhesives.
 A repurposed cassette rack freshened up with a bit of white spray paint hold most of my stamp pads.
 In the knee hole under the counter top is my iris carts full of designer papers and misc 12x12 card stock.
 Top left drawer full of re-inkers.
 My Jetmax cubes. On the very top is my Bigshot as well as some Sizzix dies that don't fit anywhere else. The top row holds 12x12 card stock and stuff for the current months design team projects. The lower fabric drawers hold all of my Our Daily Bread Designs stamps and various other unmounted stamps in cd cases. The upper fabric drawers hold various stickers and embellishments. The open slots hold albums in process, retired In Color card stock and idea books.
 Inside the two cupboard doors are all of my dies, Nestabilities and embossing folders. The drawers on the left hold various coloring tools, embellishment kits and glitters and embossing powders. The drawers on the right hold misc single wood mounted stamps and chipboard.
 My collection of glitters, embossing powders, stickles and small stamp pads
 My top shelf holds catalogs, magazines and two notebooks full of sketches. Two shelves hold wood mounted stamps that I decided not to unmount, including my background stamps, several alphabets and sets that my daughter uses. Three notebooks hold unmounted stamps as do the 4 boxes on the bottom shelf. The white plastic baskets hold cards that need to be package for sale and 6x6 designer papers. When I purchase a large pad or stack of designer paper there are usually 3 sheets of each design. I take one sheet of each design (saving the other two for scrapbooking) and cut it into 4 6x6 pieces. I share some and use the rest for making cards.
 Most of my Stampin' Up! stamp sets are unmounted and stored on the lid of their original box. Stored this way an entire shelf of stamp sets fits in one box.
 I hope you have enjoyed the tour of my creative space and I hope I have encouraged you to do some reorganizing too.
1. keep like things together, for example all the paper in one place, all the ribbon in another.
2. unmount most of my wood mounted stamps to conserve space
3. to have everything within reach but put away
I function better creatively when everything is put away. My space is tiny, only 10 foot x 9 foot and I have to share the space with my washer, dry and large freezer, so every inch needs to be used to its best advantage and ruthlessly organized.
Here is the view from the doorway. The walls are just a shade lighter then Ruby Red. You get a look at my main work area. The butcher block table used to reside in my parents home, I inherited it when they moved to Florida. In the far left corner tucked between the freezer and the wall is most of my sewing stuff, the mending basket sits on top. The remainder of my fabric and nearly completed quilts are under the table.
 This picture shows my secondary work area. The counter height is nice to stand at and it has plenty of room to spread out a two page scrapbook layout as well as providing space for a friend to join me. Note the storage spaces both above and below the counter. The baskets on top of the cabinets hold sewing patterns as well as misc other crafting supplies.
 This is the view from in front of freezer showing my Jetmax storage units and shelves as well as my laundry sorter. The double doors seen through the doorway lead to our family room.
 View from the other corner of the room showing washer, dryer and freezer. Note my grandmother's sewing box on top of the freezer (the white thing on top of that is my homemade photo light box) and my design team calender on the freezer door.
 This is my main work surface. Under the dust cover is my antique sewing machine. The dust cover, my curtains, stool cushion and ironing board cover were all made from a repurposed table cloth. All my pens, pencils and markers are within easy as well as my most used tools.
 Just to the left of my table is my rolling cart which hold my paper cutters and scrap file.
 A closer look at my secondary work area. The cabinets are stock cabinets from Lowes, as is the counter top. The drawers on the left hold re-inkers, photographs and albums. On the right the drawers hold tools, alterable items and album page refills. I plan on acquiring a 14x26 inch piece of glass to put on my counter top so that I can leave scrapbook pages in process out but covered so that they can not be disturbed by cats or children.
 On the counter top is my extensive collection of ribbon. Current Stampin' Up! ribbon is on the right. The 4 ribbon boxes hold all the rest. The jar holds ribbon scraps.
The black drawers hold all of my punches.
 Since ya know you want to look in my cupboards here is a peek of the center one.
 and the right holds card stock and envelopes.
 The left one holds more card stock, craft stamp pads, embellishments and adhesives.
 A repurposed cassette rack freshened up with a bit of white spray paint hold most of my stamp pads.
 In the knee hole under the counter top is my iris carts full of designer papers and misc 12x12 card stock.
 Top left drawer full of re-inkers.
 Inside the two cupboard doors are all of my dies, Nestabilities and embossing folders. The drawers on the left hold various coloring tools, embellishment kits and glitters and embossing powders. The drawers on the right hold misc single wood mounted stamps and chipboard.
 My collection of glitters, embossing powders, stickles and small stamp pads
 My top shelf holds catalogs, magazines and two notebooks full of sketches. Two shelves hold wood mounted stamps that I decided not to unmount, including my background stamps, several alphabets and sets that my daughter uses. Three notebooks hold unmounted stamps as do the 4 boxes on the bottom shelf. The white plastic baskets hold cards that need to be package for sale and 6x6 designer papers. When I purchase a large pad or stack of designer paper there are usually 3 sheets of each design. I take one sheet of each design (saving the other two for scrapbooking) and cut it into 4 6x6 pieces. I share some and use the rest for making cards.
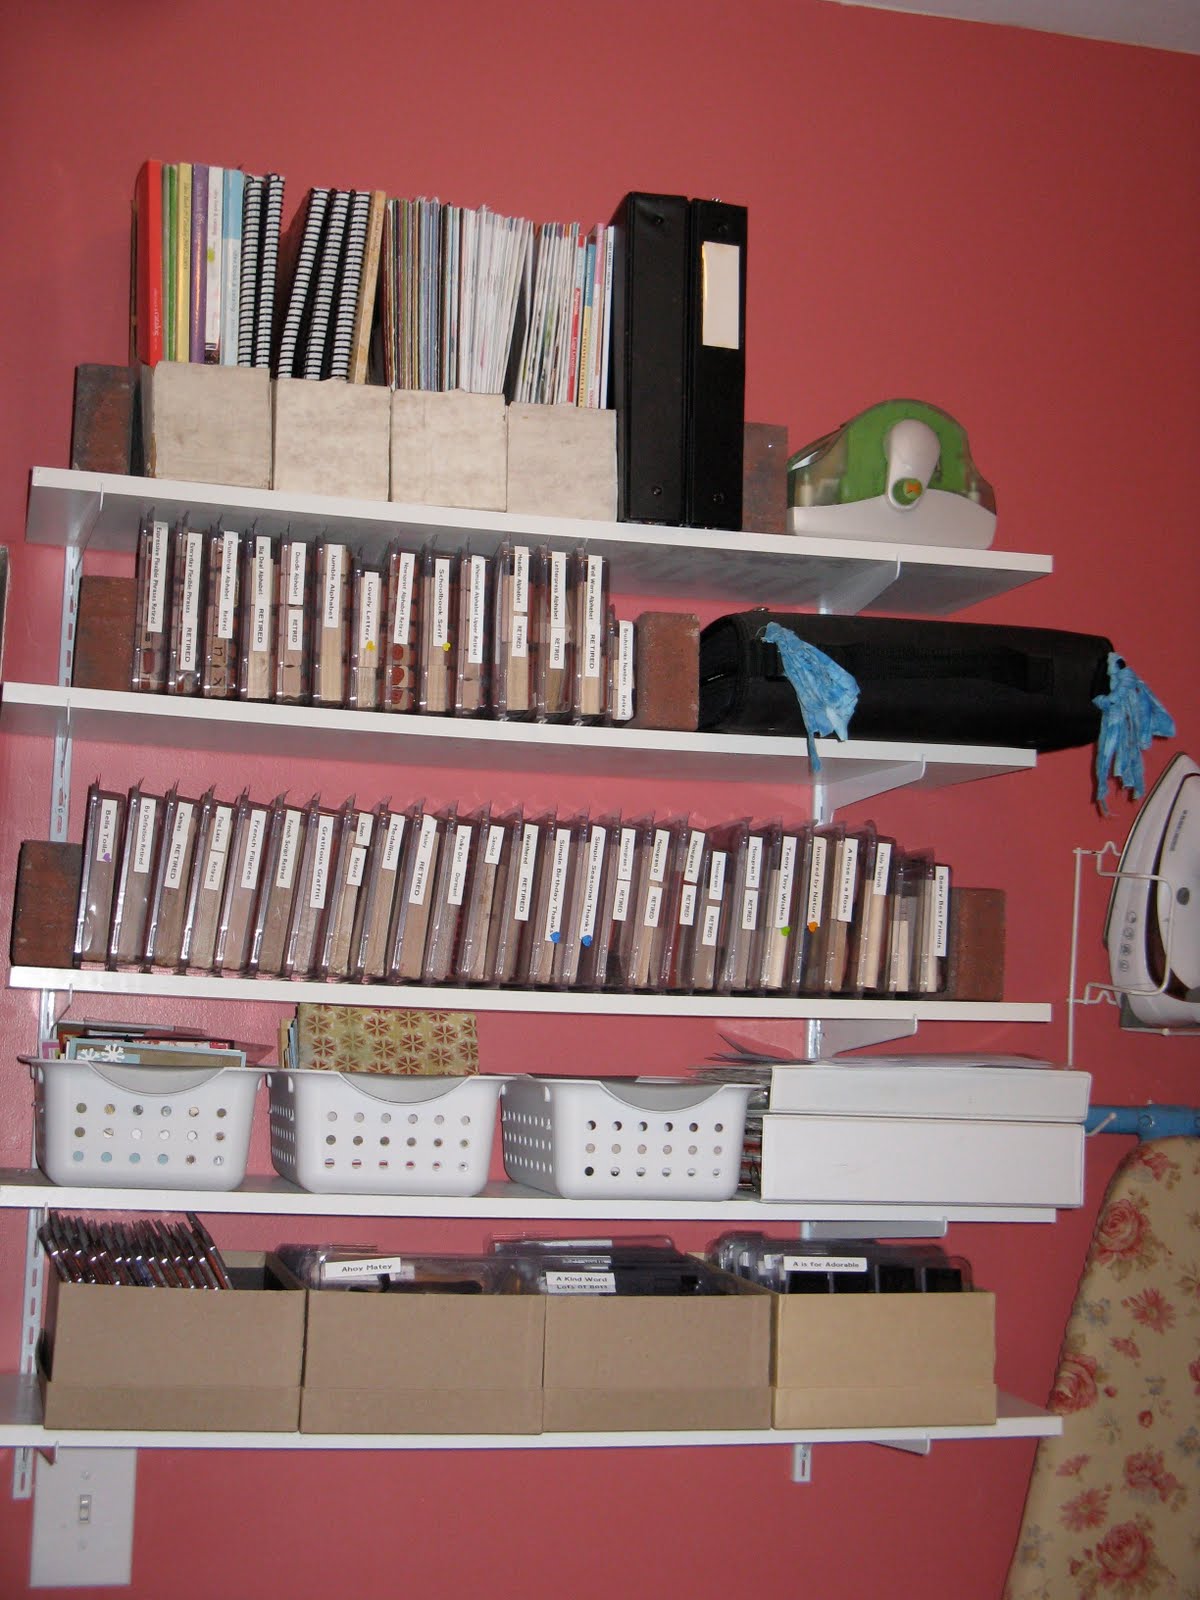 Most of my Stampin' Up! stamp sets are unmounted and stored on the lid of their original box. Stored this way an entire shelf of stamp sets fits in one box.


Comments
Thanks for sharing.
Laura
Can I ask you a question about your counter tops? You mentioned on SCS that you just bought a slab. Is that marble? We have something almost identical in our bathroom and it's very COLD to the touch. Just wondering if you've noticed that and it bothers you to work on.
My counter top is just a stock laminated counter top from Lowes. I paid around $50 for the 6 foot piece that I bought. I like because it is easy to clean up and if for some reason I manage to destroy it I'm not out a lot of money.